Online Screen Recorder: User Guide
Finding recording software that is lightweight, free, and does not add watermarks to your videos has always been a frustrating task. Gravador.Net was designed to eliminate this barrier. It is a professional-level web application that works natively in your browser, without requiring time-consuming downloads, complex installations, or account creation.
To deliver superior performance without slowing down your computer, our platform uses WebCodecs technology. In practice, this allows the site to access your machine's own hardware acceleration to process the media. The result is video files in .MP4 and audio in .M4A with impeccable quality, ready to be uploaded to YouTube, shared on WhatsApp, or imported into professional video editors.
🔒 100% Local Processing (Your Privacy Guaranteed)
The great advantage of this tool is that no video goes to the internet. All video recording and export are done locally, within your own browser. Whether recording meetings or lessons, feel safe: no data leaves your computer.
1. How to Record PC Screen and Online Meetings
Screen capture is the essential feature for those creating video lessons, recording gameplays, or needing to document meetings on Google Meet, Zoom, and Microsoft Teams. Knowing that these processes are usually long, we developed a system focused on your data security.
The End of Corrupted Videos: Auto-Split System
The greatest risk of recording long videos directly through the browser is the RAM memory limit. If you record two uninterrupted hours, the chances of the browser crashing and you losing all the material are extremely high. To neutralize this problem invisibly, Gravador.Net features Intelligent Cutting (Auto-Split) technology.
Every 10 minutes of recording, our internal engine finishes that block of video, saves the file securely to your local gallery, and starts recording the next block in fractions of a second. You won't notice any flickering screens or cuts in your voice. Upon finishing your one-hour meeting, you will have the content saved and organized into parts, eliminating the risk of losing hours of work due to a power outage.
Step by Step to Record Your Screen:
- Access the top menu of the site and click on the "Screen" tab.
- In the settings panel, activate the Microphone switch if you want to record your own voice during the explanation.
- Click on the blue "Record Screen" button.
- The browser will open the standard system window asking what you want to capture (a specific browser Tab, a Window of an open program, or the Full Screen of your monitor).
- Make your choice and click share to start the capture.
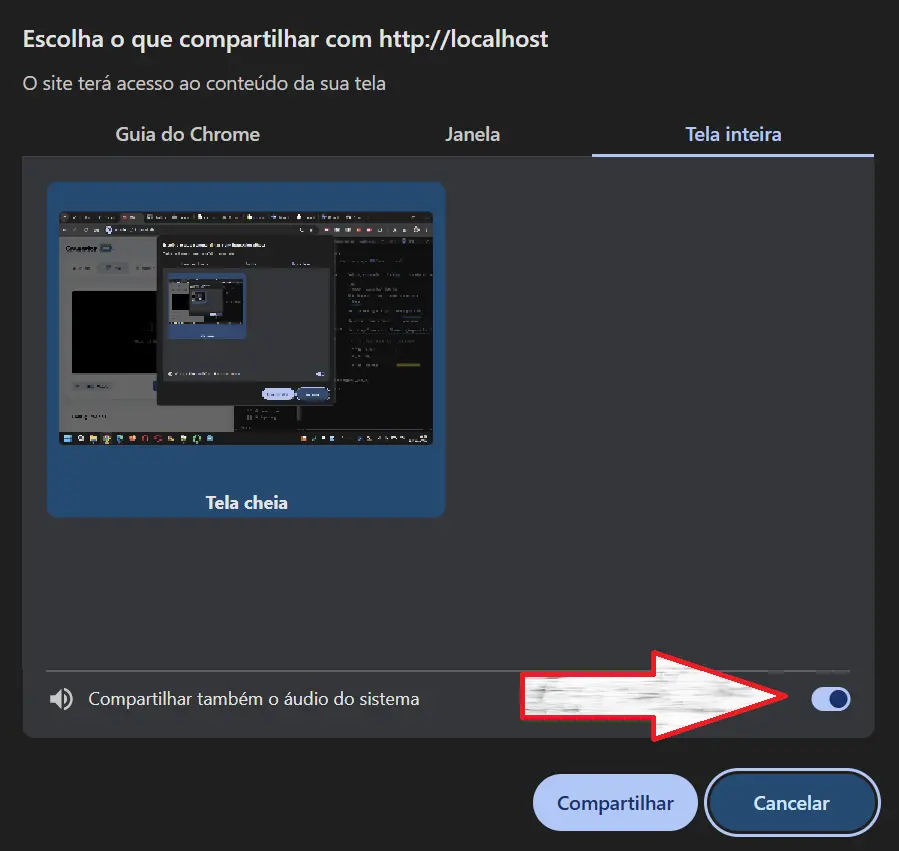
Maximum Attention: The error everyone makes when recording audio
You know when you finish recording the meeting and realize only your voice came out in the video, while everyone else was silent? This happens because the microphone does not capture the sound coming from the computer itself.
To solve this once and for all: at the exact moment the browser window opens asking you to choose which screen to record, STOP AND LOOK at the bottom of that window. You MUST CHECK the box that says "Also share system audio" (or Share system audio). If you don't do this, the site will not be able to capture the sounds coming from your PC (like a YouTube video or the teacher's voice).
2. Voice Recorder: Create High-Fidelity Audio
Whether starting a podcast, recording important voice notes, or recording a voice-over for a video you are editing, our audio tool delivers professional results without the learning curve of complex editing software.
Industry Standard and Visual Feedback
We standardized audio export to the .M4A (AAC codec) format. Widely used by high-quality streaming platforms and Apple devices, this format ensures clean voice capture free of compression noise, generating incredibly lightweight files.
So you can be sure the audio is being captured (and don't waste time speaking into a muted microphone), the tool features a spectrum visualizer. As you speak, the graph responds to the frequencies of your voice in real-time. And there's more: in your recording gallery, the site automatically generates a visual "cover" showing the exact sound wave pattern (Waveform) of your audio, making file identification easy.
3. WebCam: Practical Filters and Strict Privacy Control
The WebCam function transforms your camera into a content production tool. Unlike simple recording, the system renders the image on a Canvas, allowing you to apply filters and image adjustments in real-time. The file is already saved with the treated coloration, skipping the color correction stage in editing.
Intelligent Hardware Management (Your light goes off)
Leaving camera permission activated in a browser tab often causes discomfort. To ensure your peace of mind and save your notebook's battery, we implemented Visual Presence Sensors on the site. It works under strict rules:
- If you switch to another browser tab to read a text...
- If you scroll down the page to view your gallery and the camera frame leaves your view...
- Or if the site window is minimized...
The platform cuts the connection to your camera and microphone instantly. Your webcam's indicator light will go off. The camera only turns back on when you return to viewing the tool actively. You have the technical guarantee that you are not being accidentally monitored.
Photography Function (Quick Capture)
Found the perfect framing or ideal lighting with our filters? Just click the "Take Photo" button. The system will immediately extract that video frame and download a high-quality PNG image to your computer.
4. Floating Mode (Picture-in-Picture)
The Floating WebCam (PiP) mode is the favorite feature for teachers and content creators. It clips your camera video and turns it into a small borderless window that stays always visible on top of all other windows of your operating system.
How to use it in practice?
- Lessons and Lectures: You can open your slides in full screen in PowerPoint or open a PDF file and position your camera in the corner of the screen, maintaining eye contact with your audience while explaining the material.
- Hybrid Recording (Monitor + Face): A powerful technique is to activate the WebCam's PiP mode and then return to the site and start Screen Recording. The resulting video will show everything you do on the computer along with your reaction in the corner of the screen. A perfect format for YouTube.
Frequently Asked Questions (FAQ)
Does the site put a watermark on my video?
No! Your videos are 100% clean, as we keep the site running by displaying those ads on the sides.
The only exception is if you use an ad blocker. If the tool detects that you are hiding our banners, we mandatorily activate a short 2-second screen at the end of your video promoting the site.
Can I customize this End Screen?
Yes! Those who do not use an ad blocker get free access to the "End Screen". There in the settings, you can choose the background color, put your channel's logo, type a thank you text, and even choose music to play automatically at the end of the video.
Why does the site bar say my storage is full?
Videos take up a lot of space on your computer or phone. The browser warns you when your HD space is exceeding 90%. To avoid the risk of the video not being saved, delete old videos from your gallery or free up space on your phone itself.
I use Firefox. Why did the tool ask me to wait 30 seconds?
Browsers like Firefox still have certain technical limitations for working with MP4 files in the browser. Because of this, the End Screen animation does not work there.
To compensate for this, Firefox users who use ad blockers will receive a "time" penalty, having to wait 30 seconds when finishing the video. To remove this wait time, just pause the blocker or access the site through Google Chrome/Edge.